Quick post on how to get Lightworks running on Opensuse Leap 15.2 as I ran into a few problems. I discovered that Opensuse Leap 15.2 is not officially supported by lightworks however it was relatively simple to get it working. The error I was getting was because the glibc version installed by Opensuse is too old. I think it is something like version 2.26 and lightworks needs version 2.29 or above. Why the version in opensuse is so old I do not know, we are on version 2.33 I think.
So what I did was download the rpm of version 2.33 from here, and extract it as an archive. I then found the required library that lightworks needed, “libm.so.6” which is a simlink to “libm-2.33.so”.
All that was then required was to copy both of those files into “/usr/lib/lightworks/” as that is one of the first places that lightworks looks for libraries. This seems to have solved the problem. I did not install all of glibc 2.33 as I think this would have caused problems elsewhere, and it seems that this is the only missing library that lightworks needed.
I have recently setup a secondary server using Unraid to run backups (including with BackInTime). (I will do a full post about it at some point.) I will use this server as a BackInTime server for my Linux workstation, and the Time Machine server for my Mac laptops. Getting it working with the Macs was a bit of a pain, but I got there in the end. But today I shall talk about getting it to work with BackInTime, which I think I have now done.
I ran into a problem thar the standard rsync configuration used by BackInTime was not able to copy files that started with an ‘_’ from the workstation over to the smb share on the Unraid server. This was because when rsync made the temporary ‘._*’ file it would fail as smb doesn’t allow that file name. This was a problem because some of the software libraries that I was using for projects have files that start with ‘_’. So the result was that the snapshots were missing those files and completing with errors. Not ideal. The actual number of files that this affects is fairly low and I could probably live with it, but really it would be better if a solution could be found.
The solution
It turned out that the solution was fairly straight forward in the end. I had to disable the vfs objects fruit and streams_xattr for the share. Then it worked perfectly. The problem is that unraid sets those automatically for each share. So I have to manually delete them, and then restart samba each time I reboot the server. Fortunately that will not be very often.
Still, it would be better to find a more permanent solution. I am currently looking for that, and have posted to a couple of forums to see if anyone knows if it is possible to have custom settings for a share that are not overwritten each time the array is started.
I cloned my linux system disk with clonzilla. Ifs very straight ward, the video below shows you how I did it. Better than my other video as I recorded it into a HDMI capture card, gets around the dodgy camera angle of last time.
I needed more space in my home server so got another two 6TB drives, and I decided to also replace the system disk as it is pretty old. I cloned the existing drive using Clonzilla and then expanded the partitions to fill the available space. Check out the video for the full details.
I have received a new Lenovo ThinkPad Carbon X1 (6th generation, mine is the 20KH model with NFC and the higher res screen) which I have been trying to get Kubuntu 18:04 LTS Linux running on. This has been largely successful with a few problematic areas. Mostly the trackpad. I am a fan of mouse pointer emulation, which allows you to do one finger tap for mouse left click, two finger for right click, and three for middle. This is what I haven’t been able to get working really.
The Trackpad
The problems with the trackpad are that it would be slow to start working on boot, and often when waking from sleep. Also mouse button emulation intermittently failed. This would be accompanied with CPU usage spikes that I think were some sort of driver crashing, trace state, or similar.
Edit: This is probably the fix we are looking for! Install xserver-xorg-input-synaptics (which for me is xserver-xorg-input-synaptics-hwe-18.04). The left ‘i2c_i801’ commented out of the ‘/etc/modprobe/blacklist.conf’. This seems to have got it. I now have a trackpad that works on boot and after waking from sleep. I also have the config controls in the settings. So I think this is the way forward. In addition, as the physical buttons did occasionally stop working after reboot, I suggest getting the pm-utils to run the following commands at wake up which I put in a bash script.
#!/bin/bash
#reconnects trackpad after sleep

case "$1" in
    post)
        echo -n "none" | sudo tee /sys/bus/serio/devices/serio1/drvctl
        echo -n "reconnect" | sudo tee /sys/bus/serio/devices/serio1/drvctl
    ;;
esac
The best place for the bash script in Ubuntu 18.04LTS is in a file in /lib/systemd/system-sleep/ which I called trackpad, make sure you make it executable.
Possible fix one: Getting the trackpad working might require that ‘i2c_i801’ is commented out of the ‘/etc/modprobe/blacklist.conf’. This will fix the problems with it being detected on start and coming out of sleep.
However… possible fix two: You might have more success with leaving ‘i2c_i801’ on the blacklist and adding ‘psmouse.synaptics_intertouch=1’ to you grub config (‘/etc/default/grub’) and then running ‘sudo update-grub’. This seems also to work.
So this is the problem with intermittent faults. Getting to the bottom of the problem and the solution is very difficult. So I would suggest you try both and see what works better.
It will not however fix the problems with mouse click emulation intermittently failing. That I have not found a fix and instead switched it off altogether. You are then left with using the mouse buttons.
Sleeping
To get sleeping working correctly you need to make use that in the BIOS the sleep mode is set to Linux instead of windows. That is it. Without that then the system will not come in and out of sleep properly.
Other than these issues, and the WAN modem not working (no driver), the laptop seems to work well.
I wanted to install TensorFlow GPU on my Kubuntu System (currently 16:04 LTS but I believe it also works for 18.04LTS). I am interested in trying TensorFlow with both Java and Python, I have done some testing with Python so far. Java I will try later.
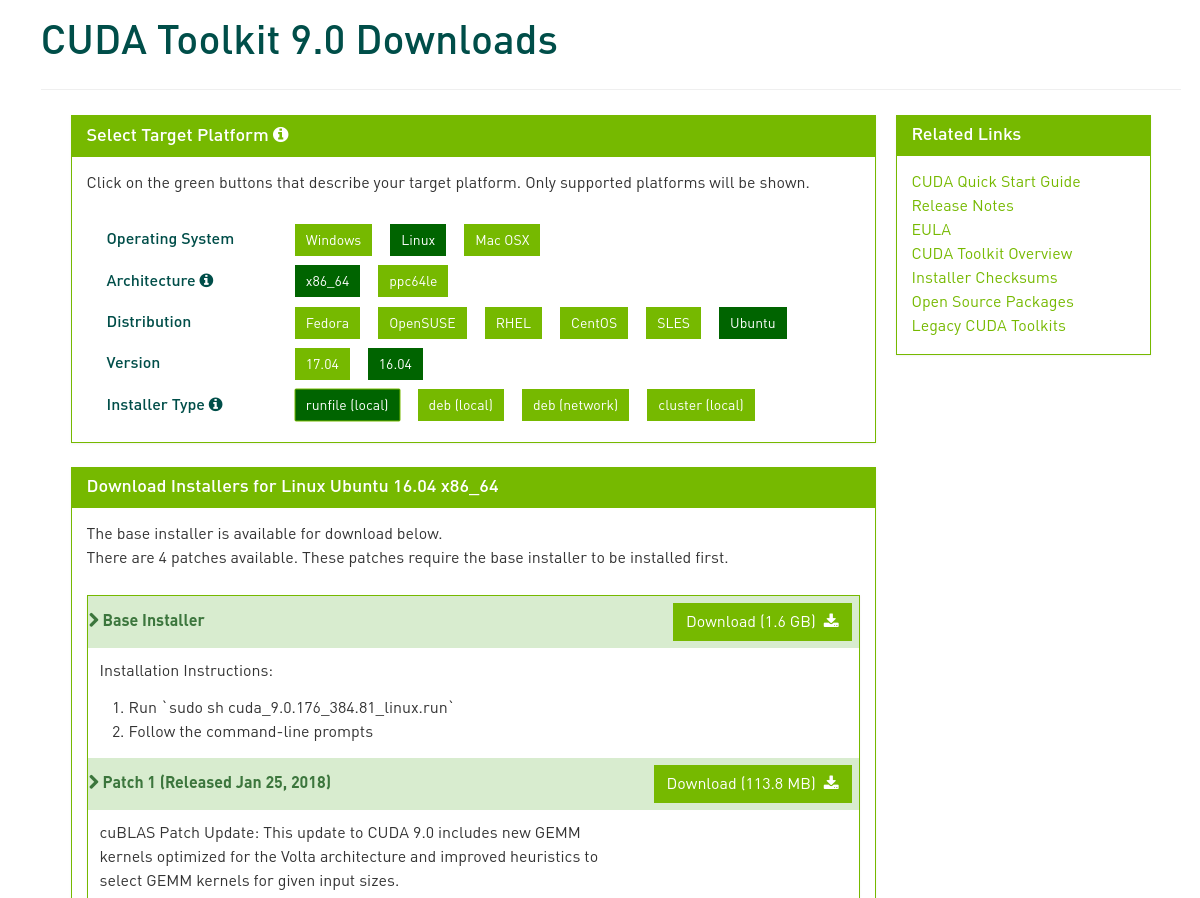
I first updated my system to ensure that all the packages were up to date, and I also used the Driver utility to install the NVidia Driver, version 396.54. TensorFlow uses Cuda 9.0 at the minute so you have install the version, you can get it here. I use the local runfile, this is as it is an easy way of getting cuda installed in /usr/local and the samples installed in your home directory. If like me you have already installed the Nvidia drivers, skip the step to install the drivers as its not required.
I choose the local run file.
Once you have it downloaded run it, remembering to skip the driver install if you have them installed already.
sudo ~/Downloads/cuda_9.0.176_384.81_linux-run
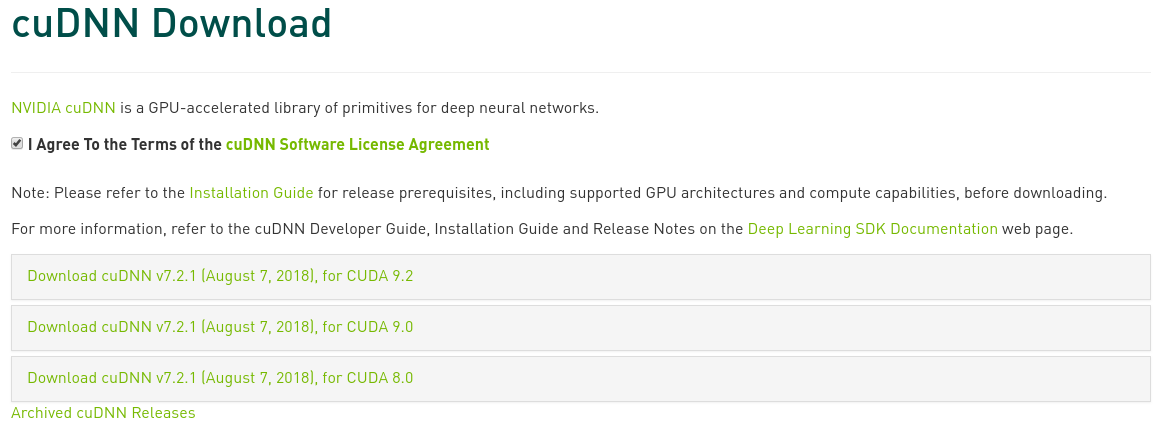
TensorFlow also needs Nvidia cuDNN to work, you have to join as a Nvidia developer and then you can download this, pick the version for Cuda 9.0.
Make sure that your .bash_profile file in your home dir contains something like (I am not sure the last one is needed, seems to be in there from ages ago):
Note that I have a symlink from /usr/local/cuda to /usr/local/cuda-9.0/. That is cuda installed, you can check it is working by compiling one of the samples that use it.
Next install TensorFlow, I did this in the python evironment, the full details are here. As I have a Tesla K20 in this system I installed the version with GPU support. I use python 3.5.
#install pip and virtualenv
$ sudo apt-get install python3-pip python3-dev python-virtualenv

#upgrade pip
$ sudo pip install -U pip

#make a dir to work out of
$ mkdir ~/tensorflow
$ cd ~/tensorflow

# I chose Python3 environment for the environment directory:
$ virtualenv --system-site-packages -p python3 environment_dir

#activate the environment
$ source ~/tensorflow/environment_dir/bin/activate

#in the virtual environment upgrade pip
(environment_dir)$ pip install -U pip

#then install tensorflow with gpu support
(environment_dir)$ pip install -U tensorflow-gpu

#check it works
(environment_dir)$ python -c "import tensorflow as tf; print(tf.__version__)"
Following on from my post about mining ZCash I decided to mine some Akroma coin, I like the look of the project as it has some nice features and who knows. Maybe it will take off! I don’t have a lot of mining hardware, but I have a test system for messing about with this stuff. I do mining more for interest, and I buy some coins for investments. Which are doing ok.
I downloaded the miner from here, it is a version that has the dev fee, but I am fine with that as making software is hard work. You need to get a wallet, I chose the web wallet as that seems like a reasonable option at the minute. In general I prefer stand alone wallets but this is fine until there is a better option for Akroma.
I am running the miner in eth only mode on Ubuntu Linux using the following command:
On the K40 I get about 11.6 Mh/s, which is slightly less than I get with a K20 (12.14 Mh/s). No idea why that might be, it could be differences with the Cuda install perhaps. I think the system with the K20 is more up-to-date. If I leave both systems running I will get about 7-8 coins in 24hrs, I will probably only run them together for a day or so and the leave one going for about 4 coins a day.
I will leave this mining for a while, generate some coins and then perhaps go back to ZCash, or try something new! I would like to build a small rig, I have an old system that could have about 3 GPUs in it. That might be the place to start, it would be cool to get one of those multi-gpu cases that could have about 4 GPUs in.
I have two Nvidia Telsa cards that I use for work, they are good for certain tasks around data mining and machine learning, and I have been interested in trying to use them for Zcash mining. I have a Antminer U3 that mines Bitcoins (slowly, and not that well sometimes), however I fancied a go at mining Zcash too. How hard could it be? Harder than it should have been.
Being Cuda cards I would obviously need a cuda enabled miner to use them. I already mine with Antpool, and they allow users to mine Zcash so that bit was easy. What wasn’t easy was trying to get a miner to compile. I tried nheqminer, that wouldn’t compile and also the newest version doesn’t work with the tesla cards I have as they are not compute 5. The older versions wouldn’t compile either. I also had a few problems with getting cuda running on Kubuntu 16.04 as I needed to upgrade the nvidia drivers which was a pain!
Solution
I got there in the end as I found a binary of nanopool’s ewbf-miner that works with cuda cards! This works great, I get about 70 Sol/s on the K20 and 95Sol/s on the K40. So that is pretty good, you would get about 40 Sol/s on a i7-6700K CPU @ 4.00GHz. I am sure that with a newer telsa or CPU you would get more. This only an experiment however, not a mining operation so I am happy.
One of my Opensuse workstations fell over. Weird problem with the login, the sddm-greeter was crashing on start. I reinstalled a bunch of things but it would not come back to life. I decided that the system could do with a restart, the partitioning was a mess and the bootloader was badly installed. The system hadn’t been reinstalled for a lone time.
I decided that I need this system to be stable, and Opensuse gets updated too frequently for some of the software that I run leaving me solving problems with missing libraries or incompatible versions of software. A Linux distro with a longer lifecycle was in order.
My initial thought was to install Centos 7, its RPM based (what I am used to) and has the required stability. However I had problems with Centos and NVidia drivers! Once installed the system would login! Rather than spend ages figuring out how to fix it I decided to which to Ubuntu, or rather Kubuntu (I am a fan of KDE). As a user of Debian for my servers I wasn’t expecting any problems. BTW the partitioner in the Centos install is a mess, they need to sort that out.
Kubuntu was straightforward to install, no problems and the partitioner is easy (take note Centos). I did have a problem that I have encountered before with Ubuntu was that the GUI crashed shortly after system start. This seems to be a problem with the opensource NVidia driver. If you drop to runlevel 3 you can install the proprietary driver and its fine. Which is ok if you don’t mind using it. So far getting the system setup has been painless and I am happy to have the system going again without problem. Now to restore all the data and apps!
I seem to be constantly trying out different ways of syncing data. I have had no end of problems with unison. Apart from being slow getting build versions to match is a constant source of frustration.
However, I have found Syncthing, which seems great so far. I have owncloud, which is great for syncing documents; think Dropbox that you own. However I have some data sets that are very large and don’t change much. Owncloud would just get clogged up looking after these. I could use rsync, which is fine, however syncthing has some nice additional features.
Syncthing is a bidirectional sync tool, that can also do versioning if you want it to. It works by running as a web service on your computers and is accessible via a web gui. It keeps directories up to date over a number of computers, there is no copy of the files in the cloud, unless you put one there. So if you delete everything off one computer it will disappear from them all (eventually). It plays well with dynamic IP addresses and firewalls. All traffic between the computers is encrypted, and it is fast. It doesn’t use up too much resource, and I set the sync frequency on my files for 1hr as they are unlikely to change that often, and also only I use them. These are large data sets of source material mainly, and photos that I edit on two computers.
Setup is pretty straightforward, the most tricky bit being auto starting the service on different computers/operating systems. It works well.